How to fly a drone. A Guide for beginners.
Congratulations on your new drone! If you’re a hobbyist or looking to create stunning aerial photography whether it be Still imagery or Video, for work, taking your first step into the world of the drone industry, it is going to be an exciting journey. Before you embark on your airborne adventures, it’s crucial to follow a few important steps to ensure the safety and smooth coordination of your drone and controller.
Get to know your Drone and Remote Controller.
This is the most important step that you must remember. Having good knowledge of how your Drone Flies and how the Drone Flying app interacts with the Drone in flight. If you chose to have the ‘It will be Grand’ approach you could end up having a very expensive Drone in small pieces, on the ground. Before you start the engines, have the Drone fully set up and battery installed correctly and switch on. Familiarise yourself with it, have the manufactures instructions open and read them before you take off. The Remote Controller is the main source of connection to the Drone. Remember you are on the ground and not in the air flying the aircraft. So, the Remote Controller is the link. You read the information that comes from the drone, while its in the air, directly through the Remote Controller. Therefore, it is really important you know your Drone, Your Remote Controller, and your Drone Flying App/Software.
Even if you’ve never flown a drone before, with practice you will become better. Many drones have modes, with DJI Drones it’s called beginner mode this allow you to get used to control and fly safely without posing a danger to the drone or anyone else. It sets a 30X30 Meter Geo-Fence around where you have taken-off from and the drone, once it has GPS connections, will not break this Geo-Fence.
Follow all safety guidelines, regulations and register your drone.
All Unmanned Aerial systems (UAS) are regulated by European Union Aviation Safety Agencies (EASA) and every nation have their own National Aviation Authority here in Ireland ours is called the Irish Aviation Authority (IAA). These guys are the Drone Regulators, among many other roles in relation to the aviation industry.
The Drone Industry within Ireland engage with the IAA for the rules and regulations coming from EASA. There are Three different categories within the regulations, but really only two at the moment will have an effect or impact on Drone operations. These are the Open Category and the Specific Category. The Open Category is then sub-divided into three sub-categories’ A1, A2 & A3. We will cover these sub-categories in another blog in the coming weeks. There have been a few changes since 1st January 2024 in relation to the Open & Specific Category that we would like to share with you.
Here are a few pointers with flying Drones within Ireland under the Open Category. (Drone <25 Kg)
- Make sure you are Registered with the MySRS portal, even if your Drone is less than 250grams. mysrs.ie
- Complete the A1/A3 Proof of online training in the MySRS portal. This is a minimum requirement.
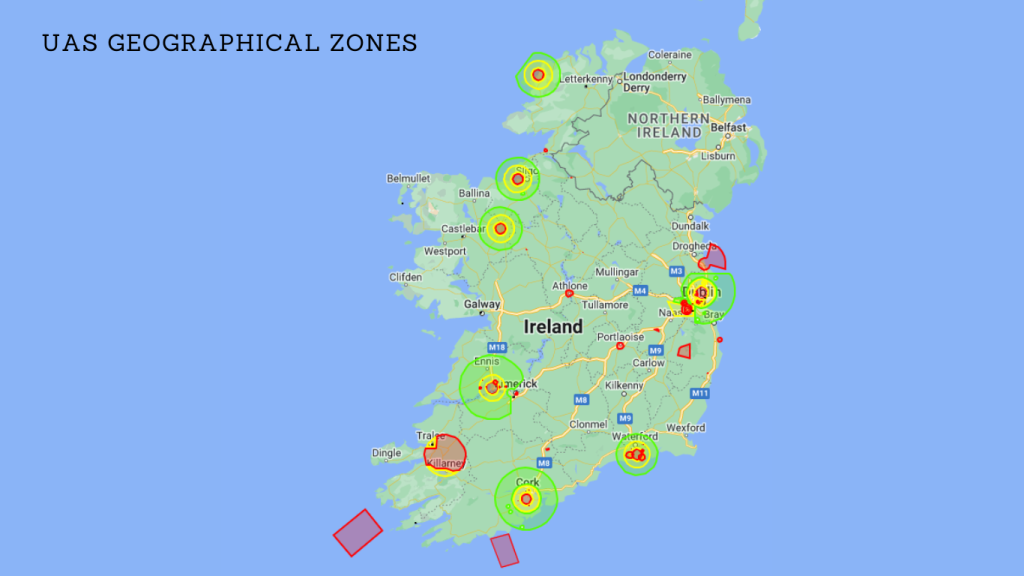
- Check Geo-Zones in relation to where you can and can’t fly under the Open Category.
- Avoid flying within 5km of airports.
- Flight Height is up to a maximum height of 120 metres from the closes point of the earth.
- Do Not Fly over uninvolved persons.
- Do Not Fly over an assembly of people.
- Always have the Drone within Visual Line of Sight (VLOS).
- Respect individuals’ privacy and adhere to applicable data protection laws.
- A drone should not be flown over military areas
- Drone insurance is recommended by the IAA, but is not legally required
As a drone operator it is your responsibility to check your location in where you intend to fly and if its within one of the Geo-Zones identify which one it is and follow the rules in relation to that Geo-Zone. For example, most Amber Zones have Parameters of a max flight height 30 meters from the closes point of the earth. If you want to fly higher than this, you need permission from the Airspace controller. As the Geo-Zones are inside controlled airspace. To review UAS Geographical Zone map in Ireland visit https://www.iaa.ie/general-aviation/drones/uas-geographic-zones
Drone Control
There are a number of things that you will need to do with your drone before it is ready for take-off.
- If you are not using a RC that has a built-in screen and you are using, you Phone or Tablet you will need to Download the Flight App onto your device.
- Create an account, try to use an email that you will always have, unless it’s a company owned account and there are a number of users on that account.
- When creating your account and you want to keep it totally separate from your own email address, why not create a new Gmail account, and use this. when creating the Gmail account keep the name short and don’t use silly names. E.g Bigbaddog@gmail.com.
- Number or Name your batteries this way you will know if you need to fly battery number three as you haven’t flown this in the last two weeks…you need to cycle your batteries otherwise you will get battery issues down the line. If you maintain a battery management system you will get great life span on the battery
- Fully Charge your controller and flight batteries.
- Connect your device. Your system should Link but if it doesn’t then simple press on the link button, instructions on how to do this will be inside your manufacturers manual.
- Verify system settings and status.
- Format SD card
Many drones on the market use a standard control layout consisting of joysticks and buttons. While the appearance of some controllers/transmitters may vary in shape and size, the basic control elements remain the same. For simplicity, today we’ll discuss modes commonly used in consumer drones.
The Remote Controller has either two or three modes for flying the Drone:
Mode 1, Mode 2, or Mode 3. When you purchase your drone the flight mode of the Remote controller default setting is Mode 2. This is mainly for righthanded persons. Which means the left Toggle/Stick is for up, down yaw left and yaw right. And the right Toggle/Stick is for forward, Backwards, Left and Right. Then you can use a combination of the two Toggles/Sticks to conduct advance flight manoeuvres.
Pushing the left Toggle/Stick up makes the drone ascend, while pushing it down makes the drone descend. Pushing the joystick left and right rotates (Yaw) the drone to the left and right, respectively.
The right Toggle/Stick controls the drone’s direction or movement. Pressing the right joystick up, down, left, and right makes the drone move forward, backward, left, and right.
You likely also have several buttons to control the camera. Using these buttons, you can take photos, record videos, tilt or move the camera, and access the menu. Familiarise yourself with what each button does before the flight. You can find these functions and features inside the Manufactures Manual.
Now this is all great, until the Drone is facing towards you, and you are commanding the Drone to fly right but it is physically as you are viewing it, flying left. This is what we call ‘Your Army Left or Your Army Right’. The reason for this is because when you take out your drone you set it up for a preflight and then get ready to take off, nine times out of ten the Camera is facing away from you. You are standing behind the drone. So, when you take off and move the Toggle/Stick left the Drone will fly to the left, but if you rotate the drone so the camera is facing you, you are now standing in front of the Drone. So, when you command the Drone to fly left it will physically move to your right. So, you need to be fully aware of where the Drone is and which way its facing when its in flight.
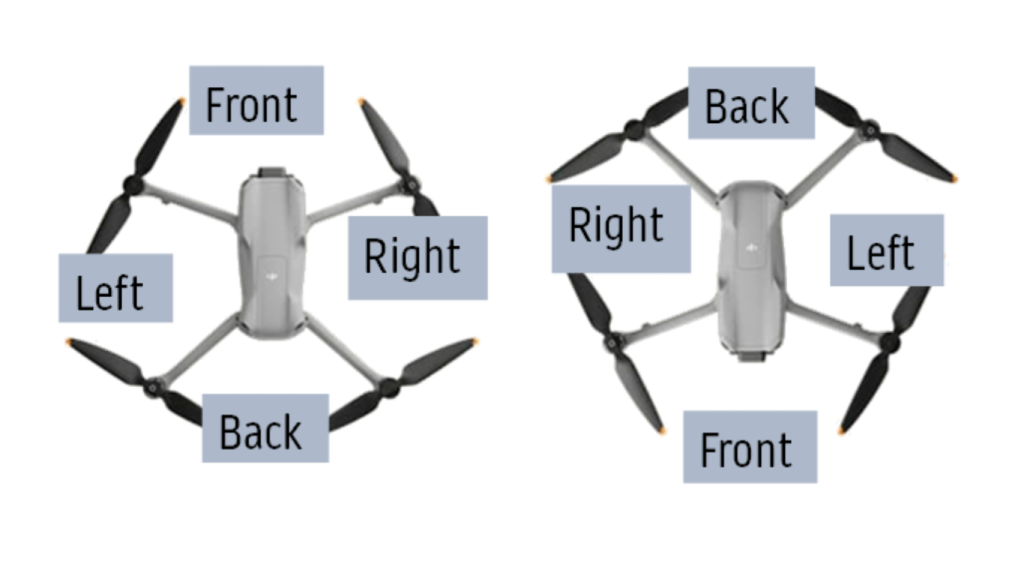
The drone control layout is quite intuitive and easy to use. This does not mean that it is easy to fly. As having situational awareness is also a very important skill to learn when flying a Drone. Remember ‘the single point of failure is the human interacting with the machine’.
For added safety, the drone should always be in GPS mode during flight so that when you release the control sticks, the drone will hover and maintain its position. If you have no GPS, then the Drone status maybe ‘Atti mode’. What happens when the drone is in Atti Mode, the Drone will remain at the same flight altitude but what ever direction the wind is flowing and its speed the drone will now move in that direction and at the same speed as the wind. If this happens the emergency procedure would be along the lines of rotate the Drone, so it is facing into the wind, drop your altitude as low and as safe as possible and manually fly the Drone back to the Home position. DO NOT trigger the Return To Home Function (RTH). As this relies on your Drone to have a GPS solution.
Practice flight manoeuvres with your drone.
Once you’ve familiarised yourself with the controls of the Remote Controller and are ready for your drone flight, the next important step is to survey the surroundings. When you arrive at a new location, take a minute to observe the area around you. This is done to avoid surprises when you take off and are in the air. Pay attention to the location of buildings, trees, and power lines to avoid any potential crashes. Prior to going to your flight area, always check where local airports are in relation to your flight area; for safety reasons, you don’t want to fly near them.
Before each flight, pay attention to the terrain and prepare for different weather conditions; wind, rain, and temperature can significantly affect flight performance. It’s a good plan to postpone the flight if rain or strong winds are expected. Your Drone has a wind limitation, this will be in the manufacturer’s manual get to know it. Most DJI drones wind limitation is either 8 meters a second or 10 meters a second, this is roughly 36kmph winds. When reading the wind speed, be mindful that most weather apps give the wind speed at ground level. The wind speed will change with height, so if the wind speed is 5m/s on the ground, it could easily be 12m/s at 100meters. We would recommend that we use Ventusky to check the weather prior to committing to a day to fly your drone. Check the Wind and the Rain. Rain can affect not only electronic equipment but also visibility and signal transmission. Similarly, wind and temperature can also affect your flight, including battery life. Always monitor the drone’s battery level to ensure you have enough time to return and land. do not fully relay on the ‘Safe Return Home Function’ on the Flying app. NEVER CANCEL a RTH function if the Flying App has initiated it.
About your First Flight
The most crucial points of a drone flight are take-off and landing. Make sure there is an open area that allows you to fly the drone in a controlled manner. Choose an area free of trees, power lines, and anything that may obstruct your line of sight between the controller and the drone.
During take-off, you need to check the area is clear from persons, objects, and animals. Never continue with the Take-off if a potential threat arises. DO NOT use the automatic take-off function. Its best that you are in control of your Drone at Take-Off and Landing. Observe your surroundings and inform others that you plan to take off. The best way to complete this is by a clear loud verbal warning Example, ‘All clear – Engines start’. Check the general area and then look at your flight telemetry and finally engage the toggles/sticks to take-off, all the while looking at the Drone, the General Area and finally the flight telemetry on the Remote Controller.
If you push hard on the Toggle/stick to ascend before you know it the drone has reached a height of about 20meters Above the Ground Level (AGL). Now this will be uncomfortable for you as more than likely you have take-off with the Drone only about 2/3 meters away from you. The correct approach is to take-off slowly and only fly up to a flight height of approx. 2meters. Then slowly move the drone forward and upward away from you.
During the flight, always pay attention to the drone’s battery level. Allow yourself extra time to bring the drone back for landing. If any unforeseen situations or conditions arise during flight, you don’t want to be stuck in the air with a quickly depleting battery. If you are unsure of what to do stay claim and push and hold the RTH button for 2 seconds and wait for the audible tone that signifies the RTH function is activated.
When you’re ready to land, inform everyone in the landing area that the drone is returning. Again, this is performed by a clear loud verbal warning, example ‘Eyes on the Drone – Returning Home to Land’ or ‘Standby – Drone Landing’. Move the drone toward the landing spot, gradually reducing speed. Land slowly and gently, controlling the control sticks. Land and ensure the propellers have stopped moving. When the drone is on the ground and the motors have stopped, power down the battery and switching off the drone before moving or picking up the drone.
Continuous Practice & Training.
Embarking on the journey of drone flying is both thrilling and rewarding. By following these comprehensive steps, you’ll not only ensure the safety of your drone and those around you but also pave the way for a successful and enjoyable flying experience.
Just remember to become a professional drone operation the crucial role is the training. At Survey Drones Ireland we offer selection of trainings dedicated to your needs. Please, check our website – https://surveydrones.ie/training-courses/ or contact directly with the team at info@surveydrones.ie. Happy flying!
